Tuesday, October 30, 2018


Five Steps to get your Kids Hooked on Skiing or Riding-the FIRST time.

It's only natural for skiing parents to want their progeny to love the sport as much as they do. But there's plenty we adults can do to derail fantasies of schusshing down the slopes in harmony with our mini-mes. To avoid that fate, follow some basic steps to ensure your littlest shredders will enjoy skiing into adulthood-or at least through the early learning stages.

1. Keep them warm.

Few things are more miserable for parents on the slopes than dealing with a child who's cold after the first couple of runs. Translation? Don't wing it with your kids' clothing. Make sure they have a comfortable, warm base layer, preferably one they've tried on and approve. Same goes for the socks, which should fit well so they don't bunch up in ski/board boots. (Anything to avoid potential whining!)
If you're not willing to invest in an official ski jacket, their daily winter coat will work just fine in the meantime. But do not, I repeat, do NOT skimp on a solid pair of ski gloves or mittens, which are critical to your kids' enjoyment on the slopes. Bonus if you include glove liners and hand warmers, which can make all the difference between a good and miserable day of skiing.
Pro tip: Lots of second-hand sports and consignment stores offer scores of used ski gear, which you can purchase at decent prices.

2. Make sure gear fits.

Ill-fitting, non-functioning gear is the perfect way for any child to talk himself out of trying to ski. In other words, don't borrow boots, poles or skis from friends; take the time to allow a professional to fit your kid for proper sizes and styles. Whether it's a weeklong or season rental, it's worth the time it takes to ensure your child's skis, boots and poles are the right size for his or her body.

3. Don't dismiss ski school.

I often see parents skiing pizza-style as they maneuver behind their child with the aid of learning harnesses and think to myself, "I'm so glad that's not me!" To be clear, there is absolutely nothing wrong with parents teaching a child to ski, with or without the aid of a harness. But if your kids are anything like my boys, they don't want to hear Mom's or Dad's tips on learning or improving technique; they prefer the age-old technique of defiance.
It's often worth it to leave it to professional ski or ride instructors, who are accustomed to handling even the most recalcitrant rookie skiers.

4. Pack enough snacks and water.

Every parent knows that kids are often hungry at the most inopportune times, and it practically guarantees it will stop them literally in their tracks midway through a ski run. To minimize hunger cravings, stockpile snacks in your own pack or your kids' pockets, whether it's a soft protein bar, an almond-butter packet or string cheese. Energy chews and fruits or nuts are also a good, quick energy option for ravenous skiers.

5. Keep the right attitude.

Take heart, parents. We all feel like we're failing our kids at some point, and the learning curve on the slopes can be steep for parents and kids alike. Give yourself and your kids a break now and then, accepting without question your offspring will test you as they learn to ski. (See bullet-point 3.) And remember: There's always next ski season.

Sunday, October 28, 2018

Tandem Skydiving


What Is Tandem Skydiving?Tandem skydiving is an extremely popular form of skydiving and an excellent introduction into the sport, it allows one to experience the adrenalin and excitement without having to commit excessively to the activity at hand. While AFF training and static-line jumping consists of hours of training prior to the jump, going tandem only requires around 30 minutes of ground preparation prior. The reason for this is that while both AFF and static-line skydives require you to learn how to control your canopy and establish a deep knowledge of maintaining specific body positions in free fall, with tandem skydiving you only need to know the basics about how you should position your body relative to your tandem master. The fact that your tandem instructor will be responsible for your chute leaves you with the ability to spend more of your effort focusing on the sheer excitement of the jump, as opposed to what procedure who'll be doing next.
You, the tandem student, will be strapped to a tandem instructor by use of a secure harness system which makes use of a shoulder strap on either side, a chest strap which secures across your chest, as well as leg straps. You will be strapped onto the chest, or front side of the tandem master, so you can be sure that you'll have the best view in the house.
While tandem jumps are most common as once off introductions to skydiving, they are also sometimes used in conjunction with training courses, specifically in the early stages of a course. Using tandem jumping in training methods when you want to learn how to skydive can be extremely effective as it allows the student to experience both freefall and canopy flight without the feeling of being thrown into the deep end, so to speak. There are also students who look to perform several tandem skydives prior to their training course in order to familiarize themselves with the environment.
A tandem freefall generally lasts between 45 and 60 seconds, followed by a four minute canopy ride to the ground.

Where To Start?

For starters, you want to make sure that you are going to be skydiving at a drop zone that has a good reputation. There are over a thousand drop zones around the world and each offer a different experience, some good and some poor. Dropzone.com has been developed around helping you to find the best drop zone in the area of your choice, and providing you with user ratings and reviews to help you make your decision. Look for drop zones with large volumes of positive reviews, and take the time to read through them and see what issues other users may have experienced at any particular drop zone. Unlike static-line progression for example, tandem skydiving is done at almost every drop zone, so you should be fine in that area, but be sure to check and make sure.
When comparing drop zones it's vital to make sure you that you understand what you will be receiving with your jump. A tandem skydive can take place between altitudes of anywhere from 10 000 to 14 000ft, if free fall time is of importance to you it's certainly worth querying this topic with the drop zone. Another important question is, if you're paying a lot for your jump, are they offering you the best services for the amount you're paying? Does your jump include video footage or still photography, most have this as an extra cost - so be sure to check what the drop zone is charging for their video services. And if it does offer video services, is this filmed from a mounted camera attached to the tandem instructor or are they pulling out all the stops and having a separate photographer joining the jump solely to take some quality photographs of your jump. These are all aspects which should be examined and considered when you're scouting for the best drop zone in your area.
Once you've located a drop zone near to your destination, give them a call or send them an e-mail, they should be more than willing to address any questions you may have about your jump and guide you through the booking process, setting you up with a date to jump.

Some Advice To Consider Before Making Your Tandem Jump

While you're likely to be walked through the correct dos and don'ts during your pre-jump ground briefing, it doesn't hurt to prepare prior to the day for what you should be doing and what you shouldn't be doing for your jump.
  • Remove jewelry and accessories prior to Tandem Skydiving. At 120mph, it begins very easy for loose jewelry or accessories to come loose during free fall and get lost. It's a good idea to leave the jewelry at home on the day of your jump.
  • Remove piercings, specifically nipple rings. When the canopy is opened during flight, your chest strap will pull against you, and there have been cases where people have had nipple rings pulled when this occurs - learn from their mistakes. Remember that there are also harness straps around your legs, so be sure to remove all piercings that may be impacted. Removing all piercings leave less gambling for something getting snagged, but nipple and surface piercings are definitely best removed.
  • Tie up your hair. Whether you're male or female, if you have long hair it is a wise idea to tie it up in a manner that makes it least likely to get caught in the harness at any stage - and also remain out of the TIs face. Tucking it into the helmet once tied is also not a bad idea.
  • Stick close to your tandem instructor. Once you're leaving the manifest for your jump, be sure to remain close to your tandem instructor.
  • Always listen to your tandem instructor. They are the ones that know best, despite what you think you know - as an inexperienced tandem skydiver, your tandem instructor should not be questioned when it comes to anything related to the procedure of, or the jump itself.
  • Be respectful and polite. While you may be frustrated at things like weather holds, it's important to remain calm and realize that these events are often out of the control of the instructors and the manifest staff.

Tandem Instructors

The tandem instructors or tandem masters are going to be the ones in control of your skydive. The fact that the tandem instructor has control over the safety of the jump has prompted strict rules and regulations, especially within the United States, as to who can lead a tandem jump. The current requirements set in place go a long way in providing peace of mind that you're going to be in excellent hands when in the air. Before a skydiver is able to be the tandem instructor on a jump, he has to go through several procedures.
First he has to be an experienced skydiver with a minimum of 500 jumps and 3 years of skydiving experience to his name, secondly he must possess a 'master parachute license' which has to be issued by an FAA-recognized organization, such as the USPA (United States Parachute Association). Furthermore, they are required to undergo training and acquire a certification related to the canopy they are going to be flying. On top of these requirements, the USPA has a few more of their own. Up until late 2008 in the United States, one was able to either be a tandem master with a manufacturer's rating or a tandem instructor which required the USPA training, though this was changed and now requires all those leading tandem jumps in the United States to hold a tandem instructors rating. The details of the ratings systems and the requirements vary between countries.
One thing that separates the best drop zones from a bad drop zone for those doing a tandem jump, is the attitude and behavior of their tandem instructor. Luckily, if you've done your research and found yourself a good drop zone, this shouldn't be a worry and you may well end up making a new friend in the process. A good instructor is one that is able to answer any questions you have, while at the same time making you feel comfortable and relaxed. The best instructors find a perfect balance between safety and professionalism and humor, after all the jump is pointless if you don't enjoy yourself.

Should I Be Nervous About Tandem Skydiving?

It's completely normal to feel nervous about skydiving, even those of us who seek adrenalin constantly have some level of nervousness at times. Jumping out of a perfectly good plane, whether it is while experiencing a tandem jump or even the thrill of wing suiting, is not something natural to us as humans, and you can be sure that you're not alone in what you feel. With that said though, as with many areas where what you're facing is foreign and unknown, your fear often tends to turn to excitement once you're in it. I have seen a countless number of first time tandem skydivers being a bit unsure in the beginning but once their feet touch the ground their mind set changes completely. These are often people performing a bucket list jump with no intention of ever skydiving again, but after they've experience the feeling of free fall, they are hooked - and often end up booking their AFF courses to become a licensed skydiver just a few days later. Tandem skydiving has an excellent safety record for most parts of the world and you can take comfort in the fact that according to the United States Parachute Association, around half a million people each year choose to tandem skydive in the US alone.

How Much Does A Tandem Jump Cost?

The price of tandem skydives vary between drop zones, generally you're looking in the price range of about $70 to in excess of $300. This cost can either include or exclude the cost of things like a camera man and a DVD copy of your skydive. We highly recommend that you look into the prices and the specifications at each drop zone. For more information read below...

A typical run through of your average tandem skydive. As can be noted the drop zone in this video offer the option of a dedicated videographer.

Things To Know About Tandems

There are typically restrictions on age when it comes to performing a tandem jump, the exact age varies depending on country and drop zone. The typical requirement from most drop zones is 18, though some drop zones do allow for 16 to 18 year olds to perform a tandem jump as long as they have parental consent. It is best to speak to your local drop zone about their age policies.
When booking a tandem skydive it's important to know what to expect, often once off tandem jumpers go in without knowing what a skydive entails, how drop zones operate and what to expect.
Understand that skydiving hinges on the weather conditions, when the winds are too strong or it's too cloudy, or if there's fog - you may well find yourself on the end of a weather hold. This is an aspect of skydiving that no one is free from, and the experienced jumpers get just as disappointed when they don't get to head out. Weather holds can last anywhere from 5 minutes to 5 days, depending on the conditions.
Because of this it's best to plan your skydive around your local weather, if you're in an area with lots of summer tropical rainfall - it may be best to book in the autumn or winter months when rainfall is less likely, otherwise booking for an earlier time in the day before daytime heating causes the development of thunder showers.
In areas of winter rainfall, summer is obviously your best bet, though nothing can ever be guaranteed. There are areas where weather holds are rare, and if you're in one of these areas that sees little annual rainfall, you're likely to see your jump happen without any hassles.
It's highly recommended that you discuss deposits and payments with the drop zones prior to booking. While most DZs will gladly discuss openly and honestly with you their rules and restrictions in regards to deposits and refunds, many fail to bring up this topic prior to finalizing their booking and they end up upset when they find out that there is no refund issued for deposits on jumps that are postponed due to weather holds.

The Technical Side And Skydiving Gear

There are a few things you should remember when you are looking at the more technical side of your skydiving gear.
Skydiving canopies are designed specifically for certain disciplines of skydiving, for speed and immediate response smaller canopies are used - such as those designed for swooping, these smaller canopies are also more dangerous, allowing for less margin of error. For tandem skydiving, where safety takes priority, the canopies (parachutes) used are much larger than those that you find in swooping for example. This is both because the canopy is going to need to carry twice the regular skydiving weight and because of the desired gentle nature of the canopy flight.
The rig that is used by your tandem instructor is set up so that it will provide optimum safety for you on your jump. The rig contains an AAD (automatic activation device) which is a safety device that is designed to automatically fire the main chute after a skydiver descends past a certain altitude and has not yet fired the main canopy. There is also the special tandem canopy, which will be the parachute that is deployed during freefall, also known as the main. There is also a reserve canopy, this is a backup that exists in case of a failure on the main, an example would be, if a main canopy opens with a line twist and one is not able to recover from it - the main would be cut and the reserve deployed. These are packed into what is known as the container, the backpack looking item on the back of the tandem instructor. The instructor will also be carrying an altimeter on him, usually around the wrist, which can provide visual or audio information on the progression of the descent, so that he can release the main canopy at the correct time.
During free fall, you can expect to reach speeds of up to 120mph (180km/h).

Thursday, October 25, 2018

Getting it in Gear for the Snowboarding/Ski season

November is an ideal time to shop for gear before everything's picked over. We headed over to their shop in Breckenridge to suss up what's new in gear this season and fill some holes in our gear inventory. In our quest to visit all 22 ski areas on my daughter's Fifth Grade Passport, I needed to ensure our goods were worthy of lasting 66 days on the slopes.

HARD GOODS: to rent or buy?

While I've been a skier and snowboarder, I haven't snowboarded in awhile. Like a lot of parents, I thought teaching my son to ski first was a natural first step. After living here for six years, he's now better than me on skis. As part of my 2018 new year's resolutions,

SKIING:

To date, it's made sense to rent hard goods for my son (who's in the 99th percentile for height).  For rentals, Elevations selection ranges from sport, premium or demo. You can rent by the day or by the season. We opted for a seasonal demo package(the nicest) for ski equipment as we're advanced skiers. If your child grows over the season, you can swap out sizes. And Elevation also allows you to swap from skis to board in the same season.
For adults new to the sport or perhaps haven't dusted off their old gear since parenthood, I recommend buying your own boots and enlist the help of a good boot fitter for the right fit. An upgraded insole like DFPs makes all the difference in comfort. Most boots (ski and snowboarding) can be heat-form molded to your foot.  With middle age has come foot issues for me. I developed Morton's Neuroma (a nerve condition that causes throbbing pain when my toes are confined) on my left foot and was sure I'd be looking at having to buy new wider boots since last season I couldn't buckle my toe buckles. I was pleased to hear my two-year old boots have at least a few more seasons left in them. The boot fitter heated up my left boot, expanded the toe box and saved me from having to buy (and break in) a new pair.

SNOWBOARDING:

We also want to snowboard this year. I haven't ridden since my pre-parenting days. Remembering what a game changer buying my own gear made back when I was learning, we opted to get our very own snowboarding gear this season. Unlike skiing, there are more variables on a snowboard in foot stance-which foot you ride forward, regular (left) or goofy (right) foot forward. And, then there's the degree in which each foot is positioned on the board which can vary by the kind of riding you like to do and your level of experience. By keeping those variables constant, it can accelerate the learning curve.
Gear, like technology, evolves quickly from year to year. In snowboarding terms, I haven't strapped a snowboard on since a flip-phone equivalent. Elevation's Snowboard Supervisor, filled me in on the big changes since the late 90s. Boards are lighter, people tend to ride a shorter length, there's talk of camber and flex. Bindings are easier to get in and out of even with gloves on. And boots feel similar to how I remember them a decade + ago (way more comfy than ski boots which I knew would make my left foot happy) with added things to pull, crank and tuck inside for a more precise amount of snugness.
After trying on all the snowboarding boots on Elevation's wall, the Salomon boot fit my foot best. To not over complicate things, we netted out with Salomon packages for boots, board and bindings for the both of us.

Wednesday, October 17, 2018

What to Bring on a Day Hike


Salomon mountaineering and freeski athlete Tony is a mountain guide in Chamonix and the southern French Alps. While testing new Salomon prototypes above Chamonix, we sat him down to ask what he recommends you bring on a day hike. Here is his advice.

A list of what you should carry in your backpack:
  • Salomon S/LAB QST Pack 
  • Down jacket 
  • Rain jacket 
  • Water – 1 liter or more 
  • Food 
  • Toilet Paper…just in case 
  • A lighter and candle 
  • Rubber ski straps (for repairing things or holding things together) 
  • Pocket Knife 
  • Headlamp with extra batteries 
  • Cell phone or radio 
  • Splint for emergencies 
  • Small Rope and Carabiners 
  • Isothermal blanket 
  • First Aid Kit 
  • Gloves


Here’s our test of the best lights on the market
Bombing around the woods in the dark may seem like a mad thing to do, but night riding is great. And you can’t do it without a proper beam – so here’s our pick of the best mountain bike lights.
There isn’t a huge amount to look forward to with winter mountain biking in the USA, but night riding must rate pretty highly on that diminutive list. Hitting the trails when everyone else is tucked up at home watching trashy telly, seeing the stars, startling the wildlife and getting your exercise in through the week is all part of the joy, but you will need some pretty serious hardware if you want to ride at anything like your normal pace.

Where to mount your mountain bike light?

A light on the bar is essential; running well below your eyeline it creates shadows in the trail ahead, generating texture to read and facilitate line choice. For fast riding you will need around 2000 lumens plus, less for more straightforward, less technical riding.
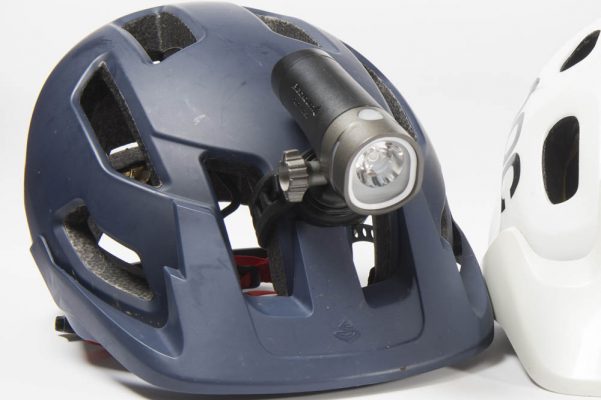
A helmet mount on its own is positively dangerous, beaming out virtually in line with the eye to flatten any shadows, rendering the view virtually two dimensional and impossible to judge.
The best setup has a bit of both – a powerful bar light for trail reading, backed up by a helmet light that allows tight corners to be negotiated, obstacles to be peered over and, of course, it lets you turn to see what the hell that rustling was in the bushes just off to your right a minute ago. Around 600-1000 lumens for a helmet mount will allow you to see far enough without overpowering those all important shadows created by your bar mount.
We have chosen bar and helmet mounted lights to test and, although just about all of them come with enough mounting hardware to do either job, they generally fall clearly into one category or another according to characteristics like power, beam pattern and weight.

The best bar-mount mountain bike lights

alpkit hadron mountain bike light

Alpkit Hadron mountain bike light

2,000 lumens. A very impressive performer for those looking for a bar-mounted light system on a budget that still performs admirably out on the trail.
Read our full review of the Alpkit Hadron
Get the Alpkit Hadron direct from Alpkit here
exposure maxx-d mountain bike light

Exposure Maxx-D mountain bike light

3,300 lumens. The Maxx-D is everything that Exposure know about mountain bike lighting. Which is a lot, in every sense. A joy to ride with and to live with.
Read our full review of the Exposure Maxx-D
hope r4 mountain bike light

Hope R4+ mountain bike light

1,500 lumens. Exquisitely made and sure to be a winner with the myriad Hope fanboys and fangirls out there. Rather expensive for the illumination though.
Read our full review of the Hope R4+
ITUO Wiz-XP3 mountain bike light

ITUO Wiz-XP3 mountain bike light

2,300 lumens. You may not have heard of this brand before but don’t go thinking this is a tinpot light. It’s impressivley well made and kicks out lots of light.
Read our full review of the ITUO Wiz-XP3
light and motion seca 2500 mountain bike light

Light And Motion Seca 2500 Enduro mountain bike light

2,500 lumens. This is very nearly a perfect mountain bike light. It’s only the niggling issues with cable layout that stop it fromclaiming full marks.
Read our full review of the Light And Motion Seca 2500 Enduro
Today's Best Deals For Light and Motion Seca 2500 EnduroAbout our deals

lumicycle explorer 2 mountain bike light

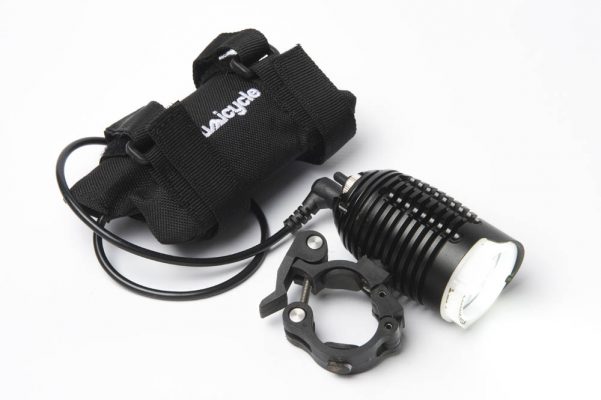
Lumicycle Explorer Plus Enduro mountain bike light

3,000 lumens. Venerable UK light brand Lumicycle take their well-reviewed Explorer and tweak its output modes for improved power and burn times.
Read our full review of the Lumicycle Explorer Plus Enduro
Get the Explorer Plus Enduro direct from Lumicycle here

The best helmet-mount mountain bike lights

blackburn central 650 mountain bike light

Blackburn Central 650 mountain bike light

650 lumens. This is a bargain helmet light even though we reckon you will almost certainly need to add the cost of a better helmet mount to the price tag.
Read our full review of the Blackburn Central 650

Tuesday, October 16, 2018

Autumn Arrives in Colorado Ski Country with Labor Day Weekend Events and Fall Festivals


With summer in Colorado’s high-country beginning to turn to fall, Colorado Ski Country USA (CSCUSA) member resorts are celebrating with a variety of Labor Day Weekend events and fall festivals. Guests can find outdoor concerts, mountain biking, fireworks, fall colors, cooler mountain temperatures and Colorado craft beers at ski area events across the state this autumn.

Winter Park Resort

Alpine & Ales Mountain Oktoberfest (September 8)
Winter Park Resort’s first Mountain Oktoberfest will offer guests the perfect atmosphere for enjoying live music, unlimited beer sampling for just $30, chainsaw carving, food and more. More than a dozen breweries will participate in this all-day autumn-inspired event. For more information, visit www.winterparkresort.com.

Telluride Resort

Telluride Film Festival (September 1-4)
Taking over Telluride for Labor Day weekend, the prestigious Telluride Film Festival is four days of movie magic, a celebration of film, community and creativity. The festival notoriously keeps its film schedule a secret, but year after year, films make their debut at the festival and go on to future success. For more information, visit www.telluridefilmfestival.com.
Telluride Festival of Cars and Colors (27-30)
The 4th Annual Telluride Festival of Cars & Colors, September  27-30, 2018 is a world-class celebration for automobile aficionados and lifestyle enthusiasts set in the beautiful town of Telluride, Colorado. Nestled in the canyons of the San Juan Mountains, it’s placed against the backdrop of Telluride’s spectacular palette of September’s autumnal colors. For more Telluride events, visit www.visittelluride.com.

Sunlight Mountain Resort

Orpheus Music & Arts Festival (August 31 – September 1)
Hosted by Sunlight Mountain Resort, Orpheus Music & Arts Festival will be a single-stage music festival dedicated to Do It Yourself creativity, sustainability and the great outdoors. Featuring independent bands, artists and vendors from Denver and Glenwood Springs, Orpheus will encourage festival goers to engage with young talent, local business and Mother Nature. Each day of the two-day festival will feature music and vendors for nearly 12 hours, with a mid-day break to allow attendees to explore downtown Glenwood Springs or hike the nearly 25-miles of on-venue trails. For more information, visit the Orpheus Music & Arts Festival.

Steamboat Resort

Wild West Air Fest (September 1)
The Wild West Air Fest will feature nationally renowned performers to thrill guests with riveting aerobatics and formation flying. Guests can also enjoy warbirds and static aircraft displays, great food, exhibits, vendors and activities for the kids.
Steamboat OktoberWest (September 14-15)
Visitors are invited to celebrate the season at a Steamboat-style Oktoberfest. The festival will feature Rocky Mountain beer, local food specialties and festivities unique to Steamboat Springs. For more information, visit www.steamboat.com.

Purgatory Resort

San Juan Mountain Bike & Music Festival (September 28-30)
The inaugural San Juan Mountain Bike and Music Festival will come to Purgatory Resort featuring bikes, beer and live music in the beautiful setting of the San Juan Mountain range. Guests will have the opportunity to test ride the latest and greatest bikes and attend several live music performances during this weekend event.
Oktoberfest (October 6)
Hosted at Purgatory Resort’s base area, Oktoberfest will welcome guests to enjoy fall festival favorites including craft beer, live music performances, traditional German food and more. Proceeds from this event will benefit the Adaptive Sports Association. For more information, visit www.purgatoryresort.com.

Powderhorn Resort

Color Sunday (September 30)
This family-friendly event at Powderhorn Resort celebrates the shorter days, dropping temperatures and changing colors of fall on the Grand Mesa. Visitors to the annual Color Sunday can enjoy a day of beautiful fall colors, live music, scenic lift rides and downhill mountain biking. For more information, visit www.powderhorn.com.

Howelsen Hill Ski Area

Free Concert Series End of Summer Jam (September 2)
The Steamboat Springs Free Summer Concert Series, celebrating 25 years of free music, will wrap up with an End of Summer Jam on September 2 featuring The Motet, Kyle Hollingsworth Band, Eric Tessmer and more. For more information, please visit the Steamboat Free Summer Concert Series website.

Granby Ranch

Third Annual Oktoberfest (September 29)
Granby Ranch will celebrate the 3rd Annual Oktoberfest featuring live polka music, cold beer and traditional fall food. Entry will be free and Oktoberfest mugs will be available for purchase.
For more information, visit www.granbyranch.com.

Crested Butte Mountain Resort

CB Unplugged
CB Unplugged is a free music series which features nationally touring artists in an intimate setting. Guests can head to Butte 66 at 4 p.m. for live music, food and drinks. Sponsored by the Town of Mt. Crested Butte, CB Unplugged will feature three free concerts in the late summer and fall months with an extremely talented lineup. Dates include the last weekend in August, September 1 and October 6.
Chili + Beer Festival (September 8)
Held at the base of Crested Butte Mountain Resort, the 20th Annual Chili and Beer Festival will attract brewers from around the region and local chefs to test their skills and recipes for over 1,200 “taste-testers” throughout the day. The event will feature locally made chili, tasty craft beer and live music. For more information, visit www.skicb.com.

Copper Mountain

Copper Country (August 31-September 2)
Copper Mountain’s Labor Day tradition celebrates the best of the American spirit. Copper Country guests will experience free admission, free live music, fireworks, kids’ crafts and an arts festival. For more information, visit www.coppercolorado.com.

Aspen Snowmass

Jazz Aspen Snowmass – Labor Day Experience (August 31-September 2)
Jazz Aspen Snowmass is a community staple in the Roaring Fork Valley, known for its legendary and entertaining lineup. This year, guests will have the chance to dance and sing along to headlining musicians Jack Johnson, Zac Brown Band, Lionel Richie, Micheal Franti & Spearhead and more. For more information, visit www.aspensnowmass.com.

Arapahoe Basin Ski Area

Oktoberfest (September 15)
Hosted in the Mountain Goat Plaza, Arapahoe Basin’s first annual Oktoberfest will feature live Austrian folk music, Paulaner beer, giant pretzels, bratwurst and schnitzel sandwiches. Guests can catch live performances by the Summit Concert Band and Those Austrian Guys and take advantage of free chairlift rides to close out the summer. For more information, visit www.arapahoebasin.com.

Winter-Ready Driving Trips For Traveling I-70

As winter weather approaches, the Colorado Department of Transportation (CDOT) is reminding drivers not to get duped into a false sense of sunshine-induced security — winter weather and winter driving will come back around and we’ll all be better off if we take time to prepare.
CDOT is offering the following list of tips and guidelines for Colorado drivers to be winter ready:

Check your tires

  • Worn tires can’t grip the road well and can be extremely hazardous. Check your tires by preforming the Quarter Test. Insert a quarter into the tire tread upside down, with Washington’s head going in first; if the top of George’s head is covered by the tread, your tires are OK (do this test in multiple points around each tire). If the top of his head is visible at any point, you need new tires.
  • Invest in safety by getting a set of snow tires. When it comes to stopping safely on snow and ice, all-season tires simply don’t compare to winter tires (see infographic).
  • If your tires don’t have at least a one-eighth inch tread when a Traction Law is called, you are in violation of the law and could end up with a fine.

Leave extra room

  • Leave extra room between your vehicle and others on the road at all times.
  • Even vehicles with four-wheel/all-wheel drive will not stop any quicker on icy roads, especially if you have inadequate tires.

Drive for conditions

  • In poor visibility, don’t drive faster than you can see ahead. High speeds in poor visibility can lead to dangerous chain reactions.

Bow to the plow

  • Snow plows need space to work, so unless you want to cause a crash, delays or be stuck on a snow-covered road, don't crowd the plow!
  • If you must pass a snowplow, do so on the left and with extreme caution.

Be I-70 smart

  • Check Goi70.com to see travel forecasts for the I-70 mountain corridor, travel tips, rideshare, transit and parking information, deals on lodging, food and entertainment for travelers and more.
  • Remember to avoid peak travel times whenever possible and consider carpooling or alternative transportation.

Have a plan

  • If you are stuck in a serious storm, do not leave your car. Run the engine periodicallyand wait for help.
  • Prepare a winter driving vehicle kit. Carry blankets, water, a flashlight, a shovel, some nutrition bars or other food for sustenance. Winterize your vehicle's safety kit by including extra blankets, sand to help gain traction in the event you become stuck on ice or snow, jumper cables and an ice scraper.
Additionally, all motorists should be familiar with Colorado’s Passenger Vehicle Traction Law and Passenger Vehicle Chain Law. These laws are implemented when weather and road conditions require it, at which time highway signage will be activated to alert drivers.
  • Traction Law — When the Traction Law is in effect, motorists must have snow tires, tires with mud/snow (M/S) designation, or a four-wheel/all-wheel drive vehicle — all tires must have a minimum one-eighth inch tread.
  • Passenger Vehicle Chain Law — Reserved for severe winter conditions as the final safety measure before an interstate is closed, the Passenger Vehicle Chain Law states that every vehicle on the roadway must have chains or an alternative traction device (like AutoSock).
Without proper equipment, you can be fined $130. If your vehicle blocks the roadway, you could be fined more than $650.
Stacia Sellers, Communications Specialist for CDOT states, “Winter driving safety is a two-way street. CDOT will use snowplows, courtesy patrol vehicles and numerous operations systems to keep Colorado’s roads safe this winter, but we need drivers to be prepared and do their part as well. It only takes one person with bad tires to throw everything off.”

Thanks to CDOT and Goi70.com for this comprehensive list of winter driving tips.