Thursday, October 25, 2018

Getting it in Gear for the Snowboarding/Ski season

November is an ideal time to shop for gear before everything's picked over. We headed over to their shop in Breckenridge to suss up what's new in gear this season and fill some holes in our gear inventory. In our quest to visit all 22 ski areas on my daughter's Fifth Grade Passport, I needed to ensure our goods were worthy of lasting 66 days on the slopes.

HARD GOODS: to rent or buy?

While I've been a skier and snowboarder, I haven't snowboarded in awhile. Like a lot of parents, I thought teaching my son to ski first was a natural first step. After living here for six years, he's now better than me on skis. As part of my 2018 new year's resolutions,

SKIING:

To date, it's made sense to rent hard goods for my son (who's in the 99th percentile for height).  For rentals, Elevations selection ranges from sport, premium or demo. You can rent by the day or by the season. We opted for a seasonal demo package(the nicest) for ski equipment as we're advanced skiers. If your child grows over the season, you can swap out sizes. And Elevation also allows you to swap from skis to board in the same season.
For adults new to the sport or perhaps haven't dusted off their old gear since parenthood, I recommend buying your own boots and enlist the help of a good boot fitter for the right fit. An upgraded insole like DFPs makes all the difference in comfort. Most boots (ski and snowboarding) can be heat-form molded to your foot.  With middle age has come foot issues for me. I developed Morton's Neuroma (a nerve condition that causes throbbing pain when my toes are confined) on my left foot and was sure I'd be looking at having to buy new wider boots since last season I couldn't buckle my toe buckles. I was pleased to hear my two-year old boots have at least a few more seasons left in them. The boot fitter heated up my left boot, expanded the toe box and saved me from having to buy (and break in) a new pair.

SNOWBOARDING:

We also want to snowboard this year. I haven't ridden since my pre-parenting days. Remembering what a game changer buying my own gear made back when I was learning, we opted to get our very own snowboarding gear this season. Unlike skiing, there are more variables on a snowboard in foot stance-which foot you ride forward, regular (left) or goofy (right) foot forward. And, then there's the degree in which each foot is positioned on the board which can vary by the kind of riding you like to do and your level of experience. By keeping those variables constant, it can accelerate the learning curve.
Gear, like technology, evolves quickly from year to year. In snowboarding terms, I haven't strapped a snowboard on since a flip-phone equivalent. Elevation's Snowboard Supervisor, filled me in on the big changes since the late 90s. Boards are lighter, people tend to ride a shorter length, there's talk of camber and flex. Bindings are easier to get in and out of even with gloves on. And boots feel similar to how I remember them a decade + ago (way more comfy than ski boots which I knew would make my left foot happy) with added things to pull, crank and tuck inside for a more precise amount of snugness.
After trying on all the snowboarding boots on Elevation's wall, the Salomon boot fit my foot best. To not over complicate things, we netted out with Salomon packages for boots, board and bindings for the both of us.

Wednesday, October 17, 2018

What to Bring on a Day Hike


Salomon mountaineering and freeski athlete Tony is a mountain guide in Chamonix and the southern French Alps. While testing new Salomon prototypes above Chamonix, we sat him down to ask what he recommends you bring on a day hike. Here is his advice.

A list of what you should carry in your backpack:
  • Salomon S/LAB QST Pack 
  • Down jacket 
  • Rain jacket 
  • Water – 1 liter or more 
  • Food 
  • Toilet Paper…just in case 
  • A lighter and candle 
  • Rubber ski straps (for repairing things or holding things together) 
  • Pocket Knife 
  • Headlamp with extra batteries 
  • Cell phone or radio 
  • Splint for emergencies 
  • Small Rope and Carabiners 
  • Isothermal blanket 
  • First Aid Kit 
  • Gloves


Here’s our test of the best lights on the market
Bombing around the woods in the dark may seem like a mad thing to do, but night riding is great. And you can’t do it without a proper beam – so here’s our pick of the best mountain bike lights.
There isn’t a huge amount to look forward to with winter mountain biking in the USA, but night riding must rate pretty highly on that diminutive list. Hitting the trails when everyone else is tucked up at home watching trashy telly, seeing the stars, startling the wildlife and getting your exercise in through the week is all part of the joy, but you will need some pretty serious hardware if you want to ride at anything like your normal pace.

Where to mount your mountain bike light?

A light on the bar is essential; running well below your eyeline it creates shadows in the trail ahead, generating texture to read and facilitate line choice. For fast riding you will need around 2000 lumens plus, less for more straightforward, less technical riding.
A helmet mount on its own is positively dangerous, beaming out virtually in line with the eye to flatten any shadows, rendering the view virtually two dimensional and impossible to judge.
The best setup has a bit of both – a powerful bar light for trail reading, backed up by a helmet light that allows tight corners to be negotiated, obstacles to be peered over and, of course, it lets you turn to see what the hell that rustling was in the bushes just off to your right a minute ago. Around 600-1000 lumens for a helmet mount will allow you to see far enough without overpowering those all important shadows created by your bar mount.
We have chosen bar and helmet mounted lights to test and, although just about all of them come with enough mounting hardware to do either job, they generally fall clearly into one category or another according to characteristics like power, beam pattern and weight.

The best bar-mount mountain bike lights

alpkit hadron mountain bike light

Alpkit Hadron mountain bike light

2,000 lumens. A very impressive performer for those looking for a bar-mounted light system on a budget that still performs admirably out on the trail.
Read our full review of the Alpkit Hadron
Get the Alpkit Hadron direct from Alpkit here
exposure maxx-d mountain bike light

Exposure Maxx-D mountain bike light

3,300 lumens. The Maxx-D is everything that Exposure know about mountain bike lighting. Which is a lot, in every sense. A joy to ride with and to live with.
Read our full review of the Exposure Maxx-D
hope r4 mountain bike light

Hope R4+ mountain bike light

1,500 lumens. Exquisitely made and sure to be a winner with the myriad Hope fanboys and fangirls out there. Rather expensive for the illumination though.
Read our full review of the Hope R4+
ITUO Wiz-XP3 mountain bike light

ITUO Wiz-XP3 mountain bike light

2,300 lumens. You may not have heard of this brand before but don’t go thinking this is a tinpot light. It’s impressivley well made and kicks out lots of light.
Read our full review of the ITUO Wiz-XP3
light and motion seca 2500 mountain bike light

Light And Motion Seca 2500 Enduro mountain bike light

2,500 lumens. This is very nearly a perfect mountain bike light. It’s only the niggling issues with cable layout that stop it fromclaiming full marks.
Read our full review of the Light And Motion Seca 2500 Enduro
Today's Best Deals For Light and Motion Seca 2500 EnduroAbout our deals

lumicycle explorer 2 mountain bike light

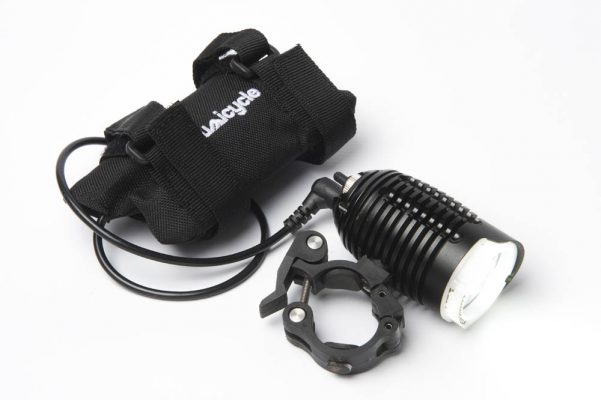
Lumicycle Explorer Plus Enduro mountain bike light

3,000 lumens. Venerable UK light brand Lumicycle take their well-reviewed Explorer and tweak its output modes for improved power and burn times.
Read our full review of the Lumicycle Explorer Plus Enduro
Get the Explorer Plus Enduro direct from Lumicycle here

The best helmet-mount mountain bike lights

blackburn central 650 mountain bike light

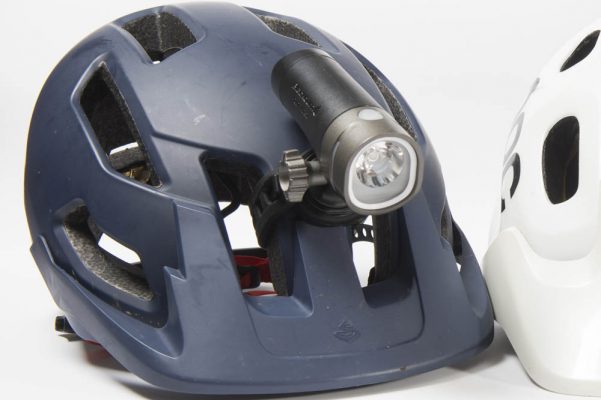
Blackburn Central 650 mountain bike light

650 lumens. This is a bargain helmet light even though we reckon you will almost certainly need to add the cost of a better helmet mount to the price tag.
Read our full review of the Blackburn Central 650

Tuesday, October 16, 2018

Autumn Arrives in Colorado Ski Country with Labor Day Weekend Events and Fall Festivals


With summer in Colorado’s high-country beginning to turn to fall, Colorado Ski Country USA (CSCUSA) member resorts are celebrating with a variety of Labor Day Weekend events and fall festivals. Guests can find outdoor concerts, mountain biking, fireworks, fall colors, cooler mountain temperatures and Colorado craft beers at ski area events across the state this autumn.

Winter Park Resort

Alpine & Ales Mountain Oktoberfest (September 8)
Winter Park Resort’s first Mountain Oktoberfest will offer guests the perfect atmosphere for enjoying live music, unlimited beer sampling for just $30, chainsaw carving, food and more. More than a dozen breweries will participate in this all-day autumn-inspired event. For more information, visit www.winterparkresort.com.

Telluride Resort

Telluride Film Festival (September 1-4)
Taking over Telluride for Labor Day weekend, the prestigious Telluride Film Festival is four days of movie magic, a celebration of film, community and creativity. The festival notoriously keeps its film schedule a secret, but year after year, films make their debut at the festival and go on to future success. For more information, visit www.telluridefilmfestival.com.
Telluride Festival of Cars and Colors (27-30)
The 4th Annual Telluride Festival of Cars & Colors, September  27-30, 2018 is a world-class celebration for automobile aficionados and lifestyle enthusiasts set in the beautiful town of Telluride, Colorado. Nestled in the canyons of the San Juan Mountains, it’s placed against the backdrop of Telluride’s spectacular palette of September’s autumnal colors. For more Telluride events, visit www.visittelluride.com.

Sunlight Mountain Resort

Orpheus Music & Arts Festival (August 31 – September 1)
Hosted by Sunlight Mountain Resort, Orpheus Music & Arts Festival will be a single-stage music festival dedicated to Do It Yourself creativity, sustainability and the great outdoors. Featuring independent bands, artists and vendors from Denver and Glenwood Springs, Orpheus will encourage festival goers to engage with young talent, local business and Mother Nature. Each day of the two-day festival will feature music and vendors for nearly 12 hours, with a mid-day break to allow attendees to explore downtown Glenwood Springs or hike the nearly 25-miles of on-venue trails. For more information, visit the Orpheus Music & Arts Festival.

Steamboat Resort

Wild West Air Fest (September 1)
The Wild West Air Fest will feature nationally renowned performers to thrill guests with riveting aerobatics and formation flying. Guests can also enjoy warbirds and static aircraft displays, great food, exhibits, vendors and activities for the kids.
Steamboat OktoberWest (September 14-15)
Visitors are invited to celebrate the season at a Steamboat-style Oktoberfest. The festival will feature Rocky Mountain beer, local food specialties and festivities unique to Steamboat Springs. For more information, visit www.steamboat.com.

Purgatory Resort

San Juan Mountain Bike & Music Festival (September 28-30)
The inaugural San Juan Mountain Bike and Music Festival will come to Purgatory Resort featuring bikes, beer and live music in the beautiful setting of the San Juan Mountain range. Guests will have the opportunity to test ride the latest and greatest bikes and attend several live music performances during this weekend event.
Oktoberfest (October 6)
Hosted at Purgatory Resort’s base area, Oktoberfest will welcome guests to enjoy fall festival favorites including craft beer, live music performances, traditional German food and more. Proceeds from this event will benefit the Adaptive Sports Association. For more information, visit www.purgatoryresort.com.

Powderhorn Resort

Color Sunday (September 30)
This family-friendly event at Powderhorn Resort celebrates the shorter days, dropping temperatures and changing colors of fall on the Grand Mesa. Visitors to the annual Color Sunday can enjoy a day of beautiful fall colors, live music, scenic lift rides and downhill mountain biking. For more information, visit www.powderhorn.com.

Howelsen Hill Ski Area

Free Concert Series End of Summer Jam (September 2)
The Steamboat Springs Free Summer Concert Series, celebrating 25 years of free music, will wrap up with an End of Summer Jam on September 2 featuring The Motet, Kyle Hollingsworth Band, Eric Tessmer and more. For more information, please visit the Steamboat Free Summer Concert Series website.

Granby Ranch

Third Annual Oktoberfest (September 29)
Granby Ranch will celebrate the 3rd Annual Oktoberfest featuring live polka music, cold beer and traditional fall food. Entry will be free and Oktoberfest mugs will be available for purchase.
For more information, visit www.granbyranch.com.

Crested Butte Mountain Resort

CB Unplugged
CB Unplugged is a free music series which features nationally touring artists in an intimate setting. Guests can head to Butte 66 at 4 p.m. for live music, food and drinks. Sponsored by the Town of Mt. Crested Butte, CB Unplugged will feature three free concerts in the late summer and fall months with an extremely talented lineup. Dates include the last weekend in August, September 1 and October 6.
Chili + Beer Festival (September 8)
Held at the base of Crested Butte Mountain Resort, the 20th Annual Chili and Beer Festival will attract brewers from around the region and local chefs to test their skills and recipes for over 1,200 “taste-testers” throughout the day. The event will feature locally made chili, tasty craft beer and live music. For more information, visit www.skicb.com.

Copper Mountain

Copper Country (August 31-September 2)
Copper Mountain’s Labor Day tradition celebrates the best of the American spirit. Copper Country guests will experience free admission, free live music, fireworks, kids’ crafts and an arts festival. For more information, visit www.coppercolorado.com.

Aspen Snowmass

Jazz Aspen Snowmass – Labor Day Experience (August 31-September 2)
Jazz Aspen Snowmass is a community staple in the Roaring Fork Valley, known for its legendary and entertaining lineup. This year, guests will have the chance to dance and sing along to headlining musicians Jack Johnson, Zac Brown Band, Lionel Richie, Micheal Franti & Spearhead and more. For more information, visit www.aspensnowmass.com.

Arapahoe Basin Ski Area

Oktoberfest (September 15)
Hosted in the Mountain Goat Plaza, Arapahoe Basin’s first annual Oktoberfest will feature live Austrian folk music, Paulaner beer, giant pretzels, bratwurst and schnitzel sandwiches. Guests can catch live performances by the Summit Concert Band and Those Austrian Guys and take advantage of free chairlift rides to close out the summer. For more information, visit www.arapahoebasin.com.

Winter-Ready Driving Trips For Traveling I-70

As winter weather approaches, the Colorado Department of Transportation (CDOT) is reminding drivers not to get duped into a false sense of sunshine-induced security — winter weather and winter driving will come back around and we’ll all be better off if we take time to prepare.
CDOT is offering the following list of tips and guidelines for Colorado drivers to be winter ready:

Check your tires

  • Worn tires can’t grip the road well and can be extremely hazardous. Check your tires by preforming the Quarter Test. Insert a quarter into the tire tread upside down, with Washington’s head going in first; if the top of George’s head is covered by the tread, your tires are OK (do this test in multiple points around each tire). If the top of his head is visible at any point, you need new tires.
  • Invest in safety by getting a set of snow tires. When it comes to stopping safely on snow and ice, all-season tires simply don’t compare to winter tires (see infographic).
  • If your tires don’t have at least a one-eighth inch tread when a Traction Law is called, you are in violation of the law and could end up with a fine.

Leave extra room

  • Leave extra room between your vehicle and others on the road at all times.
  • Even vehicles with four-wheel/all-wheel drive will not stop any quicker on icy roads, especially if you have inadequate tires.

Drive for conditions

  • In poor visibility, don’t drive faster than you can see ahead. High speeds in poor visibility can lead to dangerous chain reactions.

Bow to the plow

  • Snow plows need space to work, so unless you want to cause a crash, delays or be stuck on a snow-covered road, don't crowd the plow!
  • If you must pass a snowplow, do so on the left and with extreme caution.

Be I-70 smart

  • Check Goi70.com to see travel forecasts for the I-70 mountain corridor, travel tips, rideshare, transit and parking information, deals on lodging, food and entertainment for travelers and more.
  • Remember to avoid peak travel times whenever possible and consider carpooling or alternative transportation.

Have a plan

  • If you are stuck in a serious storm, do not leave your car. Run the engine periodicallyand wait for help.
  • Prepare a winter driving vehicle kit. Carry blankets, water, a flashlight, a shovel, some nutrition bars or other food for sustenance. Winterize your vehicle's safety kit by including extra blankets, sand to help gain traction in the event you become stuck on ice or snow, jumper cables and an ice scraper.
Additionally, all motorists should be familiar with Colorado’s Passenger Vehicle Traction Law and Passenger Vehicle Chain Law. These laws are implemented when weather and road conditions require it, at which time highway signage will be activated to alert drivers.
  • Traction Law — When the Traction Law is in effect, motorists must have snow tires, tires with mud/snow (M/S) designation, or a four-wheel/all-wheel drive vehicle — all tires must have a minimum one-eighth inch tread.
  • Passenger Vehicle Chain Law — Reserved for severe winter conditions as the final safety measure before an interstate is closed, the Passenger Vehicle Chain Law states that every vehicle on the roadway must have chains or an alternative traction device (like AutoSock).
Without proper equipment, you can be fined $130. If your vehicle blocks the roadway, you could be fined more than $650.
Stacia Sellers, Communications Specialist for CDOT states, “Winter driving safety is a two-way street. CDOT will use snowplows, courtesy patrol vehicles and numerous operations systems to keep Colorado’s roads safe this winter, but we need drivers to be prepared and do their part as well. It only takes one person with bad tires to throw everything off.”

Thanks to CDOT and Goi70.com for this comprehensive list of winter driving tips. 

Wednesday, October 3, 2018

Bike Packing Gear

 Wanted to share with you guys both my camping setup as well as my faster, lighter “ultra racing” or “staying in hotels” modifications. I’ve used the camping setup on Trans North Georgia and a couple other overnighters, where other than food I was self sustaining. The lighter setup was used on this year’s Huracan 300, where other than a quick nap at a hotel, I rode straight through.

I started out originally stuffing a lot of items in the handlebar bag as it was easy, but I learned that I needed to keep the front end light as I needed a good balance on singletrack. I took my setup to the free ride trails here in town, where despite looking kind of dumb, I was able to hit the rocky gulley at pretty good speed. I also evolved to not carrying a backpack. It’s easier on the sit bones, easier on the shoulders, and for longer adventures, I feel it’s a must. If it’s a one day or less adventure, I still love a Camelbak pack, but for something longer, its SO nice to not have to deal with it. Also, the jersey pockets can be used as overflow for a sandwich or something. Here is the setup I use for when I camp. I like using a hammock personally, but I can also forego that and instead just lay out under the stars on a sleeping pad. The pad and the hammock are about the same size.

Handlebar – The Relevate Designs sling is great to hold things against the bars. I’ll be upgrading to a Revelate harness at some point, as it keeps the items better off the handlebar, but this works for now. I keep the sleeping bag in it’s own dry bag, so if it rains, the rain fly won’t get the down bag all wet. The rain fly is optional, and if the weather is looking great, I’ll leave it out, and replace it with the shirts and pants from the seat bag.
  • XS Evac dry bag with REI Flash 32 degree sleeping bag
  • ENO hammock rain fly
  • S Evac compression bag
Gas Tank – I use a  Topeak Large gas tank is a little smaller and leaner than the Revelate one and works better with my shorter steerer tube. Here I keep my battery pack for the front light, as well as the battery pack that powers the Garmin and my phone if need be.
  • Goal Zero battery pack
  • USB cord for Garmin
  • Battery pack for light
  • Bear whistle
  • Snacks
Jerrycan – This is a cool little Revelate Designs bag that sits between my legs on the top tube. This is food only as it’s easy to grab and fits Clif bars and Gu gels perfectly
  • Revelate Designs Jerrycan
  • Snacks
Mountain Feed Bag – Another Revelate product, this one is “overflow”. When I buy a coke or Gatorade I keep it here. I store some Gu gels and my Chamois Buttr packets in the mesh pockets. Frame Bag – Revelate sells a custom frame bag for my Salsa and this is the centerpiece of my kit. Here I carry my water and tools.
  • Small Pocket
  • Cards/IDs in a plastic bag
  • Arm warmers
  • Leg warmers
  • Rag for sunglasses
  • Leatherman CX (Knife + Pliers)
  • Big Pocket
  • Tube
  • Tool Bag (multi tool, bolts, lube, derailleur cable etc)
  • 100oz bladder
  • 20oz bottle
  • zip ties (always, always, carry zip ties)
Frame – On the frame I strap on a Topeak Race pump which has duct tape and electrical tape wrapped around it. Seat Bag – I use a Revelate Pika seat bag. It’s the smaller one they make, as I didn’t need the extra room. It has more rear tire clearance so I can use it on the full suspension bike if I need to. I pack the Tube in as the first item as it gives a nice base against the seat post so I really crank the straps tight.
  • Tube
  • Rope to hang hammock
  • ENO double hammock
  • Eletrical bag (light, phone chargers, extra batteries)
  • Emergency food (couple of Clif bars and a Gu)
  • Hygiene (deodorant, toothbrush, sunscreen, etc)
  • First aid
  • Shirt
  • Pants
  • Rain jacket

When I go light, or when I know I’m going to be staying in hotels, I remove the hammock, the rope, the rain fly and the sleeping bag. What ends up happening is that removes all the weight off the handlebars and makes the rear bag quit a bit smaller as well. Then depending on whether I’m “racing” or whether just staying in hotels, I’ll remove the shirt and pants. If I’m racing, I’ll stay in the kit the whole time other than a nap,where if I’m having an adventure, it’s nice to get out of the bibs at night. I still do carry all the other items including tools, electrical, etc as I would rather be more prepared than less.

Tuesday, October 2, 2018

Basic Hiking Skills

Keeping Pace

Hiking doesn't really require any great skill. Basically, if you can walk, you can hike. There are some basic ways to make your trip safer, more enjoyable, and leaving you more refreshed than worn out. Just as a long-distance runner doesn't sprint until he's tired and then plod along, you need to pace yourself for the long day ahead. If you have a seven mile hike and 4 hours to complete it, then planning a bit more than 2 miles/hour will see you through. Using your map will help determine if you are on pace, too slow, or too fast.

Rhythmic Hiking

The best way to stay on pace is to develop a hiking rhythm. This is a cadence that you can maintain for a long time without requiring a break. Hiking to a rhythm has benefits:
  • More enjoyable hikes because you are less likely to force yourself to stressful exertion.
  • Consistent demand on muscles, rather than fluctuating strain when you change your hiking gears. Your body should be less tired on comparable hikes.
  • Minimizes need for unscheduled breaks. You plan to hike for 30 minutes, take a break, and hike some more instead of hiking until you need a break.
  • Use of hiking sticks is easier because they become part of your rhythm.
  • Easier to hike with a group when a maintainable rhythm is used by all.
  • Less chance of injury. Hiking faster increases the risk of stepping wrong and getting hurt. A slower pace with fewer rests is better than faster pace with more required rest stops.
  • More even heat generation means you won't need to remove layers while hiking and then add them when stopping to rest. Getting chilled on a hike is a bad thing to have happen all around. Do everything you can to maintain an even body temperature.

Find Your Pace


Developing your own rhythm may take some time and it will fluctuate with the environment and your skill level. Your rhythm is a comfortable, mile-eating pace that you can maintain and is fairly consistent. The first thing to do is find a comfortable pace:
  • Start out at a pace that seems fairly easy.
  • Walk for 5 minutes at this pace, taking the same length pace and the same speed of step.
  • After 5 minutes, stop and check your breathing. If you are breathing normally, then increase your pace a bit and start over. If you are breathing heavily or are sweating, then slow down your pace and start over.
  • Repeat this until you settle on a pace that barely raises your breathing but does not make you sweat.
  • Using this pace, walk for 30 minutes and mark how far you've gone. Multiply that distance by 2 to find your miles/hour pace. You might want to measure the distance in your car later.
  • The next day, hike that same distance trying to keep the same pace you used previously. See if it takes you the same amount of time. When you can cover the same distance in the same time fairly consistently, you've found a steady pace.

Set Your Rhythm

Once you have a steady pace, you can synchronize all the moving parts to set up your hiking rhythm. The goal is to get your body moving in harmony so it is more efficient and can cover more ground before tiring out.
A few simple techniques will help you keep a good rhythm:
  • Don't start out too fast in the excitement of the new day. Take it easy, warm up, and get into your rhythm as soon as you can.
  • Military groups use cadence to keep in step. You can do the same thing to keep your rhythm. I say a rhyme or sing a simple song in my head to the beat of my steps. It helps keep the same cadence going, especially on more difficult uphill sections.
  • Count your steps. If you are more analytical, counting steps helps keep you consistent and gives you something to think about. Calculate how many steps per mile or steps per hour.
  • Practice breathing. I breathe in time with my steps when I'm exerting more. Getting my breaths synchronized with my steps starts my whole body moving in a rhythm and working as a unit.
  • Take smaller steps when slowing down to go uphill. You keep the same rhythm, but the distance covered is less. This is better than forcing normal strides that require excessive effort climbing.
  • Take longer steps going downhill. Cushioning your joints is important so don't clomp, clomp, clomp down a hill just to keep your rhythm. Breaking your rhythm going downhill will have the least impact on your overall pace so go ahead and be safe on steeper, more dangerous sections.
  • Maintain your rhythm over small rises or obstacles as much as possible. You may need to push a little harder and then coast a bit for short distances. Alter your rhythm just when you really need to.
  • Swinging your arms will keep your upper and lower body synced up and in step with good momentum.
  • If you use hiking poles or a hiking stick, they can have a big impact on your hiking rhythm. On fairly level ground where I don't really need my stick for extra lift or balance, I use it this way:
    • I'm 6 feet 2 inches. My stick is 5 feet 6 inches long. I hold it 4 feet up from the tip which puts my elbow at just about a 90 degree bend. My stride is just about 3 feet, so my left foot touches down about every 6 feet.
    • I plant the stick at the same time I plant my left foot, but about 2 feet further ahead.
    • I step with my right foot, then left.
    • When I start my second right step, the stick is far behind me and my arm starts swinging it forward.
    • My left foot and hiking stick swing forward at the same time and plant to start the cycle over again.
    The consistent swinging and stepping really help me fly over the distance and the thunk of the hiking stick planting is a helpful cadence note.
    Hiking poles are shorter and lighter but can be used similarly to help keep your rhythm.

Taking Breaks

You'll need to take breaks to give your heart, lungs, and muscles an opportunity to rest up a bit. Breaks will also let you identify any sore spots, hot spots, or potential problems that you may not have noticed while in motion.
When you do take a break on a hike, try to minimize your impact to other hikers and the environment.
  • Get well off the trail to let others pass
  • Rest on a durable surface such as sand, rock, or log - not grass and flowers
  • Chat quietly - loud Tarzan whoops to be free of your pack are not in good style
  • Police the area well to find any bits of trash you may have dropped, or others may have dropped
By using a comfortable rhythmic hiking pace, you will need fewer breaks for rest but you will still want to stop to eat, use the toilet, and enjoy the scenery. There are three kinds of breaks that you'll want to schedule:
  • Rest Stop - 2 minutes to check your pack, take a drink of water, enjoy the view, and then move on. Leave your pack on for this stop and keep it very short. These work well if you find a large rock on which you can set the bottom of your pack and lean against to take the load off your shoulders for a couple minutes. Use this time to check if the pace is good for everyone. Plan to have a rest stop every 20 minutes to start and reduce to 30 minutes if desired.
  • Gas Station - 7 to 10 minutes to have a snack, use the toilet, and rest muscles. Find a nice durable area off the trail. Remove your packs, sit down, and relax. Stretch out muscles a bit, drink some water, and let your body recover. Take a gas station break every 60 to 75 minutes.
  • Restaurant - 30 to 60 minutes for lunch or dinner. Find a good spot with an enjoyable view and protection from sun and wind if possible. Good time to remove your boots and let your feet relax. Wear a pair of sandals if you brought them. When the break is over, put on a fresh pair of socks for the rest of your hike. Scheduling this stop 2/3 of the way through the hike usually works well.